Mon Mar 14, 2022 · 1082 words
Becoming a Coding Train Fanboy
Lately I've been binging a lot of YouTube again and for a while now I've been recommended The Coding Train videos, but I've never cared enough to open one of his 40min videos, until a week ago when I discovered how great his coding projects are. Upon watching the introduction of one of his approximating Pi videos I decided it would be fun to try and code the program, before watching the video. It was a fun little project and I can really recommend it.
Upon scouting around some of his other videos, I realized that his coding challenge videos all have a recurring theme: They are all really cool day/weekend projects! The first few minutes he talks about what the project will be about and he even explains it visually on his whiteboard. This is usually enough to get started in the project and is also how I created my first raycasting program. I'd watch the intro of his video, then try to code it myself and if I was stuck I would catch up in his video. I found this video about 2D raycasting and was intrigued enough to try it out. Once I got that done I also saw his 3D raycasting video and decided to create that as well. That is also what this blogpost is about.
Getting the 2D Raycasting to work
The first step was to get the base all nicely setup and get some simple raytracing setup in a 2D visual environment. For this visual environment I used SFML. A really cool C++ multi-media library. It allows one to draw lines and squares, which is all I needed for this project. It being a C++ library allows me to write inefficient code, but still have the program run really quick. Aaaaaaannd C++ is just a cool language to use in general.
I started with a single ray that had a position and a direction. Then I worked on a function to find me the intersection of that ray and a single wall (if there was one). Thankfully this was really well documented in this line-line intersection Wikipedia article. The second step was to iterate over all the walls and find the intersection that is closest to the origin of the ray. This now allowed me to shoot a ray in any direction and find the first wall it hit.
Now I was able to create a player struct that had a position, a view direction and contained an array of rays:
struct player {
    sf::Vector2f pos;
    sf::Vector2f dir;
    sf::Vector2f* rays;
};
sf::Vector2f is a 2-wide float vector from the SFML library.
At this step, I was able to create a circle of rays around the player and for each ray I checked the closest intersection of a wall. I sadly don't have a picture of this step. By reducing the degree range of the rays from 360° to 50° I was able to simulate a more realistic FOV (field of view). This then got me the effect visible in the below GIF (you'll notice there is some other shenanigans going on in that GIF, I already started on the 3D part there).

Turning 2D into 3D
Now we come to the interesting part. Here I made the 2D raycasting into something that looks 3D. This is actually fairly simple. If you've been able to follow up to here, you'll be able to follow this 3D part no problem. This is also the part that makes my 2D lines look more like Wolfenstein 3D.
To get this 3D effect I was able to simply look at all my rays and check if they're touching any wall. If they are, we can get the distance to the point of contact and draw a thin rectangle with the height depending on the distance. If the distance is bigger, we create a smaller rectangle and if the distance is lower, we create a higher rectangle. This then gives off the effect of a 3D world where far things appear small and close things appear big.
Adding colors
If all the walls are the same color, we don't really get a full 3D effect yet though. A simple way to make it look 3D is to have closer walls appear brighter and further ones darker. This also gives off an effect as if we'd be holding a diffused light. This would also be fitting for a horror game.
Here is a screenshot of how that looked:
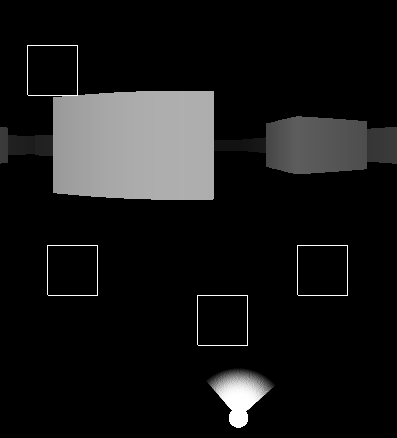 The overlayed boxes and dot with lines coming around is how the map was set up at that point.
I then went further and added some colors to the ceiling and floor, instead of simply having them be completely black:
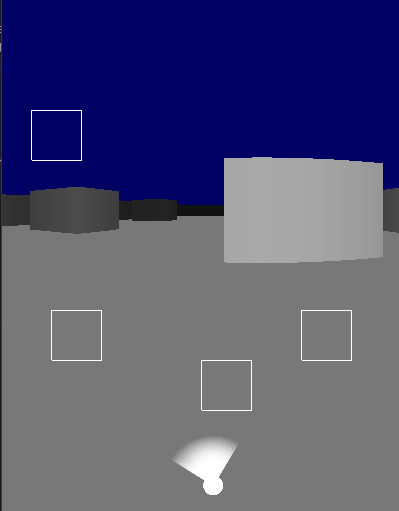
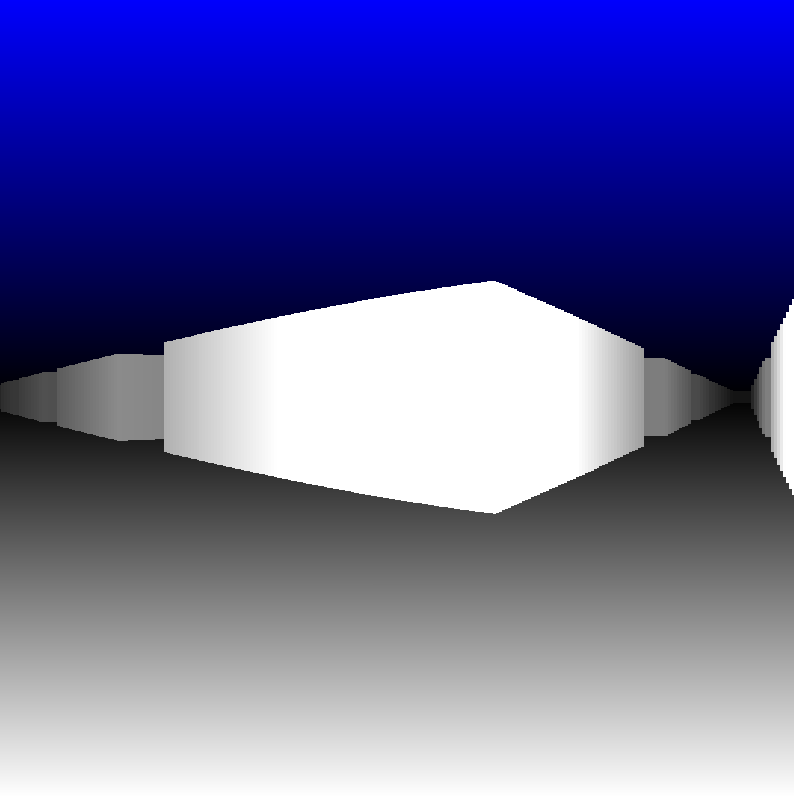
Lastly I added a gradient to the floor and ceiling to make them also look as if it's getting further away. On top of that I finally added some more boxes to the map to make it a bit more interesting to run around in:
Going forward
This project could be continued in a lot of directions. I already thought about maybe bringing in enemies which could be simple sprites that constantly look at the player (makes drawing them easier) and adding a gun just like in Wolfenstein 3D. But that would be for another time.
Additionally, if you run the program on your own machine, you might notice that the movement and turning is really slow or really fast. That's because right now I simply update the screen with a while True loop, which depending on how fast your machine is makes moving around and turning faster or slower. When I was testing around different FOVs which resulted in a lot more rays being shot out, I also had to occasionally change up the movement speed so I was able to move around at a reasonable speed. Thinking back, this could have probably simply been fixed with some deltaTime variable that measures the time since the last iteration.
All in all, this is a project I can really recommend, as it sounds like a really daunting task at first (if you've never done 3D), but as you go step by step you'll see how it all works and is really satisfying.
Source Code
If you want to try it out, the source code is all over here. Most of the files are simply boilerplate code that are used to run SFML on VSCode. The file with all the logic is src/Main.cpp.