Tue Dec 26, 2023 · 3588 words
A few weeks ago at a coding weekend I held a workshop to introduce the base concepts of the templ+htmx tech stack. The final product of that coding weekend was a quick todo app. Here is the workshop so you can also follow along to code your first templ+htmx website.
What we'll be building:
What is htmx?
htmx' motto is to stay simple. Instead of throwing huge chunks of JavaScript at a user, we only work with the actual required HTML. Using htmx we can make buttons responsive and replace elements on the website without reloading the website. The basics are, that when we click a button that should modify the site, we send a request to the backend server. The backend then doesn't return JSON, but the direct HTML which will be used to place wherever defined.
Base project layout
The project source code is available on GitHub. It is intended to be followed along starting with the template branch. The final branch has the full code of how it will look in the end. If you're ever lost when following along, you can check out the final branch to see how it should look when complete.
Sidenote: Styling seemed to be broken on Safari when I last tried it. It works on other browsers though.
Go
This project has a small amount of Go code. main.go is the whole web server. For handling requests we use chi which is a lightweight HTTP library. It allows for some nice features like easily adding middleware and getting values from routes.
The other file is internal/todo_type.go and this file only defines a single type definition. Go doesn't allow for circular dependencies and we need it in both main.go and the templ templates.
Templ
We're building a template-driven web server (similar to Django). Go has a template library out of the box (template/html), but it is not as clean as it could be. Instead for this project, we'll be using templ. Templ goes in the direction of components, similar to React. Like in the code snippet below, we can easily create a component (like Hello) and then easily use that wherever we want (using @Hello()). This gives a lot of freedom for how to use our components and it allows for a very clear structuring of the website. The syntax is also basically Go (with the same types), but we sprinkle in some HTML. Templ will generate Go code which then can be imported in main.go. It is important to make sure the generation runs and works.
package main

templ Hello(name string) {
  <div>Hello, { name }</div>
}

templ Greeting(person Person) {
  <div class="greeting">
    @Hello(person.Name)
  </div>
}
Tailwindcss
For styling everything, we use Tailwindcss. It's a must-have for designing a website. It allows you to more easily write and use CSS. For this project, most of the tailwindcss should already be added to components though, so you don't have to touch it. To make the main part of the code easier to understand and not bloated as much, all Tailwindcss has been thrown into static/tw.css.
Code along workshop
Part 1: Getting familiar with templates
Currently the main.go file is very barebones. It includes a single GET endpoint which returns our main.css file so that we have some styling on the website. The r.Get syntax is the afore-mentioned chi library and it'll also be how we can add endpoints for POST requests later on (r.Post).
I already prepared a base template which is located in components/base.templ. This file includes the htmx installation (the simple script tag) and the styling for the upcoming parts of the todo app. Using tailwind we set the background to a dark blue-grey, text to white and create a div that fully centers all its items. The { children... } tag allows the Base template to surround any other components we want.
components/todo.templ will be the file you'll also be editing. This file will contain all the todo-specific component structures.
The first thing we'll do is update our main.go with an endpoint that shows an index page:
// Handles all GET requests to /
r.Get("/", templ.Handler(components.Index()).ServeHTTP)
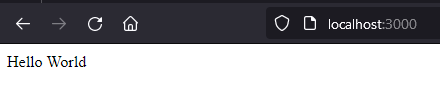
Now visit http://localhost:3000 and you'll see "Hello World".
We're missing the dark background though. Our Base is missing! Let's add that:
templ Index() {
    @Base() {
        <p>
            Hello World
        </p>
    }
}
This wraps our Index component inside of our Base component at the spot where we had { children... }.
Let's update our todo.templ to be more like an actual todo list though. We create a new component
called TodoList which will be a component containing a list of all our todos.
The id="todo-list" is what gives it some predefined styling. Don't forget it!
// The list of all todos. Basically the whole page functionality
templ TodoList() {
    <div id="todo-list">
        <h1>Todo List</h1>
        <form>
            <p>
                First Todo
            </p>
        </form>
    </div>
}
Then update the Index() component to use the TodoList template:
templ Index() {
    @Base() {
        @TodoList()
    }
}
Now we want to add a component for a single todo item called todoItem.
This will be our component for a single todo item. Because our todo list is a two
wide grid, each todo item will have two elements. The text on the left and an X button
on the right to delete the todo.
// A single todo item
templ todoItem() {
    <p>
        Todo text placeholder
    </p>
    <div class="flex justify-end">
        <button type="button">
            X
        </button>
    </div>
}
Then update the TodoList to use a few of these components:
templ TodoList() {
    <div id="todo-list">
        <h1>Todo List</h1>
        <form>
            @todoItem()
            @todoItem()
        </form>
    </div>
}
Part 2: Adding variables to templates
Okay, at this point it looks quite good already. Now comes a big step. Let's make the components use some variables we can pass in. For this, we'll use the internal.Todo struct defined in internal/todo_type.go.
- Create a todo array in
main.go:import "coding-weekend/internal" // add import ... var todos = []internal.Todo{} // all todos are stored in a global array ... func main() {... - Import the same in
todo.templat the top:import "coding-weekend/internal" - Adjust
todoItemto take a todo as an argument:templ todoItem(todo internal.Todo) {... - Adjust
TodoListto take an array of todos as argument:templ TodoList(todos []internal.Todo) {... - Adjust
Indexto also take an array of todos as argument and pass it toTodoList:
We won't be touching thistempl Index(todos []internal.Todo) { @Base() { @TodoList(todos) } }Indexcomponent anymore. - Update our route handler in
main.goto pass in the created todo array:r.Get("/", templ.Handler(components.Index(todos)).ServeHTTP) - Last step is to modify our
TodoListto create atodoItemfor every todo. For this, we add a Go for-loop:templ TodoList(todos []internal.Todo) { <div id="todo-list"> <h1>Todo List</h1> <form> for _, t := range todos { // IMPORTANT: the first value (underscore) is the index in Go. We can ignore it @todoItem(t) } </form> </div> } - All errors should be gone now. Let's finish
todoItemby making it use the passed-in todo struct:templ todoItem(todo internal.Todo) { <p> { todo.Text } // add this </p> ... - Now when we visit the site, we have an empty todo list. Let's add some mock data in
main.goto our todo list:
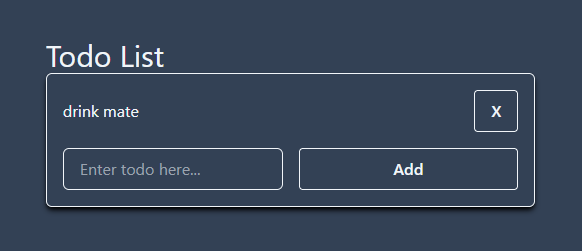
Yay, if we visit our site we now have our first dynamic todo there.var todos = []internal.Todo{ {Text: "drink mate"}, }
The last thing we want to add to this part is to add a way to add new todos. For that, we create a new component in todo.templ.
We call the component todoInput as it will be a text input field for adding new todos.
// The input field for adding new todos
templ todoInput() {
    <input
        placeholder="Enter todo here..."
        name="text"
        type="text"
        required
    />
    <button type="submit">
        Add
    </button>
}
Then below our for loop in TodoList add the input component:
...
    for _, t := range todos {
            @todoItem(t)
        }
    @todoInput() // add this
</form>
...
We won't be touching this todoInput anymore.
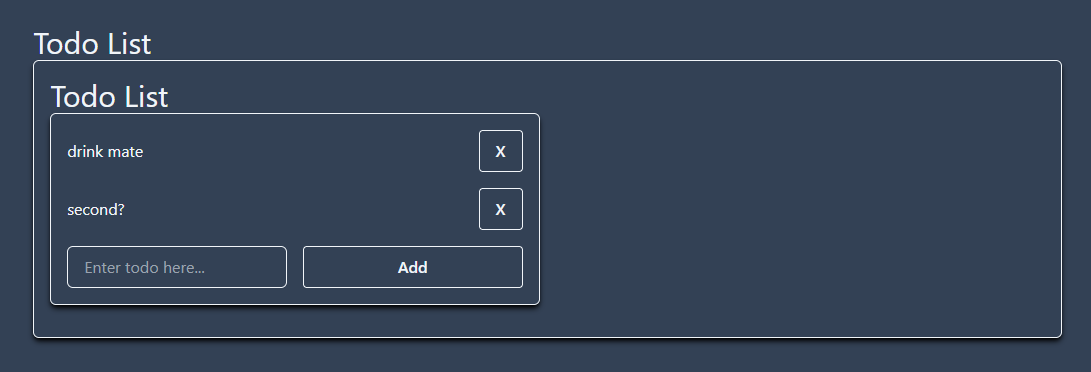
We can now visit our site and we'll see the following. This concludes all the base templating we'll be doing. When you click a button nothing happens right now except that the site refreshes. In the third part, we'll look into how to make it dynamic and function correctly using htmx.
Part 3: Making the site dynamic using htmx
-
The first thing we'll look at is adding new todos when we click "Add". You might have noticed we're using a form. By creating a form we can define the different input fields we want which will then be returned as values in a POST request using htmx.
For the next steps to work, make sure you have
name="text"in thetodoInput()text input. This will be they key for getting the value out of the POST body in the backend.Head to
TodoListwhere we have the <form> and add the followinghx-posttag:templ TodoList(todos []internal.Todo) { ... <form hx-post="/todo"> // add this ... }This basically says, "Send post request to /todo with the form values on submit". If you try and add an item now, you'll notice the website doesn't reload anymore, but in the networks tab we get a 404:

-
Head back to
main.goand we'll implement the handling of the POST method now. Basically, we want to parse the form values and get the "text" value out.// Handles all POST requests to /todo made by htmx r.Post("/todo", func(w http.ResponseWriter, r *http.Request) { r.ParseForm() // REQUIRED for the r.PostFormValue to get filled with values text := r.PostFormValue("text") log.Printf("text = %s", text) })Let's add a new todo on the website. If the website seems to just disappear, it's all working as intended until now. We should also see our text being printed in the webserver console.
-
The site seems to disappear because htmx is by default expecting us to return the new HTML. As of now, we're not returning anything though resulting in htmx just removing the element. In that case, let's update our todos-list by adding the new todo to our array and returning the required HTML for the updated todo-list:
r.Post("/todo", func(w http.ResponseWriter, r *http.Request) { r.ParseForm() // REQUIRED for the r.PostFormValue to get filled with values text := r.PostFormValue("text") todos = append(todos, internal.Todo{Text: text}) // update todos list with new todo templ.Handler(components.TodoList(todos)).ServeHTTP(w, r) // write html result }) -
Now let's try it out and see if it works... Okay, this is confusing, what is happening when I click the submit button?
That is because by default htmx replaces the inner HTML of the component that sent the request. Meaning when we submit, the outer form that sent the request will stay, but it'll replace all its contents inside with the result of our
r.Postfunction above. Let's fix that by simply swapping out the whole Todolist with the new content.Note the
id="todo-list"on the outer most div insidetempl TodoList.We do that by adding the
hx-target="#todo-list"to have it target our whole todo list andhx-swap="outerHTML"to make it replace the full target, instead of simply the contents inside. Here's how ourTodoListlooks now:templ TodoList(todos []internal.Todo) { <div id="todo-list"> <h1>Todo List</h1> <form hx-post="/todo" hx-target="#todo-list" hx-swap="outerHTML" > for _, t := range todos { @todoItem(t) } @todoInput() </form> </div> }With this, we can now add new todos and it works without refreshing the whole page.
TodoListis also fully done now. We won't be touching it anymore. -
We now have the problem, that when we refresh the page, we suddenly only have our base example of
drink mate. That is because our currentr.Get("/")route only creates the template once when we start up the Go application. Let's fix that by making it recreate the template on each request:r.Get("/", func(w http.ResponseWriter, r *http.Request) { templ.Handler(components.Index(todos)).ServeHTTP(w, r) })Refreshing the page now gives us the correct list of todos.
-
We have almost everything done already. We just need a way to clean up todos now. For that, we want to have it so clicking on the
Xbutton sends a delete request to/todo/{id}with the correct todo ID. The backend then deletes the corresponding ID and sends back the correct updated HTML for the todo list. Theoretically, htmx allows you to delete HTML elements, but to keep it simple we'll be replacing the whole todo list.Just as before, set
hx-target="#todo-list"to have it target the whole todo list andhx-swap="outerHTML"to have it replace the whole HTML tag. To have htmx create a DELETE request, we'll usehx-deleteand we use Go'sfmtlibrary to build an URL using the todo ID:import "fmt" ... templ todoItem(todo internal.Todo) { <p> { todo.Text } </p> <div class="flex justify-end"> <button type="button" hx-delete={ fmt.Sprintf("/todo/%d", todo.ID) } hx-target="#todo-list" hx-swap="outerHTML" > X </button> </div> }All our components are now fully done. We won't have to modify them anymore.
-
Time to add the delete handler in
main.go. Chi allows us to have arbitrary routes using regex. Here we only listen to routes of the form/todo/{id}where id is some number. We then convert the string parameter from the URL into an int and usingslices.DeleteFuncwe iterate over our todos array and delete all the elements that match the given ID.// Handles all DELETE requests to /todo/{id} where id is some number r.Delete("/todo/{id:\\d+}", func(w http.ResponseWriter, r *http.Request) { // make sure the argument is a valid int (not too large for example) id, err := strconv.Atoi(chi.URLParam(r, "id")) if err != nil { http.Error(w, "invalid id", http.StatusBadRequest) return } todos = slices.DeleteFunc[[]internal.Todo](todos, func(t internal.Todo) bool { return t.ID == id }) templ.Handler(components.TodoList(todos)).ServeHTTP(w, r) }) -
Last course of action. We have to add a unique ID to each todo so we can then also delete the correct one properly. We'll be doing this very simply and not thread-safe for simplicity sake.
- Add a
todoCounterwhich we'll increase every time a todo item is added. This is what we'll use for assigning IDs. Additionally, remove the hardcoded example from the array.var ( todos = []internal.Todo{} // all todos are stored in a global array todoCounter = 0 // used for assigning todo ids ) - Add the ID to created todos in our
r.Postfunction and increment the counter:todos = append(todos, internal.Todo{Text: text, ID: todoCounter}) todoCounter++
- Add a
With that, the workshop is concluded! Your site should now be in a working state where you can add and remove todo items.
User-specific todo list
The next step to how you would make this site more production-ready.
The site works as of now, but as soon as you start having more users, you'll quickly notice a problem: The todo list is shared by all users since it's completely server-side in a single slice. You'll then want to start looking into storing data on a per-user level. In the simplest terms, this can be done by creating a map with the keys being a user's hostname and the value being their list of todos. Gorilla sessions allow this to be implemented in a more secure way.